


 Thursday, January 19, 2012

Make Money Online : An unique book written by John Chow where will find lots of tips and tricks to earn money through your blog easily. Download it for free. Just click here.
Create your personal WiFi Network
Today, I am going to tell you about a software through which you can create a WiFi network of your own. To do that you got to have the following items.

20 Bangla ebooks to learn about computer easily
It is very much essential for an user to learn the basics of computers. Today, I am going to tell you about a bangla ebook site from where you can download different bangla books and you will be able learn different aspects of computer easily.

Download Internet Download Manager (IDM) Full Version for Free
Internet Download Manager shortly known as IDM is one of the most favourite software to all the Internet users. But, the fact is, it is not free. That's why, many of us are worried where to find the free version. I personally search so many site to download the portable version. Atlast, I have got one.

Popular Wordpress Tutorials: Part 1
Now a days Wordpress has become very popular for website developing. Most website developers are now using wordpress because with wordpress you can build any sort of website easily.

Connect Your Website with Facebook Fanpage
Now a day Facebook has become a great source of increasing traffic of your blog. That's why most of the blogger open a facebook fanpage to drag users from facebook. But, the fact is, most of us don’t know the procedure of how to connect this fanpage with his/her website.

Keyboard Shortcuts of your computer
These are the keyboard shortcuts of your computer through which you can use your computer easily.

Methods for passing oDesk Readiness Test Easily
Today’s post is regarding passing the oDesk readiness test. After registering at oDesk as a freelance contractor he/she has the access of only 2 bid opportunity in a month. But when you pass the Readiness Test your bid opportunity will increase up to 10 to 20 times.

Showing posts with label blogger. Show all posts
Showing posts with label blogger. Show all posts
Download 31 Days to Build a Better Blog free

Download 31 Days to Build a Better Blog written by Darren Rowse free. It is an Unique ebook to build a better blog. Try it now. Just Click here.
Connect Your Website with Facebook Fanpage
Now a day Facebook has become a great source of increasing traffic of your blog. That's why most of the blogger open a facebook fanpage to drag users from facebook. But, the fact is, most of us don’t know the procedure of how to connect this fanpage with his/her website. Today I am going to tell you about this.
Connecting website with facebook fanpage means whenever a blogger publish a new post in his/her blog, the post will automatically publish in the wall of that facebook fanpage. This can be done with a simple facebook application called “RSS Graffiti”. Just follow these steps to connect your website with facebook fanpage:
1.Go to your fanpage and click on the “Edit info” button.
2. Then click on the “Your Settings” option. (Click on the images for a large view)

3.Tick mark on the “Posting Preferences” option (If there is no tick mark) and then click on the “Save Changes” Button.
4.Now go to this link: RSS Graffiti and Like this page.
5.Click on the “Go to App” button.
6.Click on “Click HERE to authorize RSS Graffiti” button.
7.Click “Allow” and authorize your profile.
8.Now on the left side of the screen you will see the name of all the facebook fanpage you administer.


9.Click on the fanpage button you want to connect with your website.
10. Click on “Click to authorize button”.
11. Click on “Allow” and authorize your fanpage.
10. Click on “+Add feed”


11. Now insert the URL of your site on the following options: “Feed URL” & “Source URL”.
12.Insert the name of your site on the “Source Name” option.

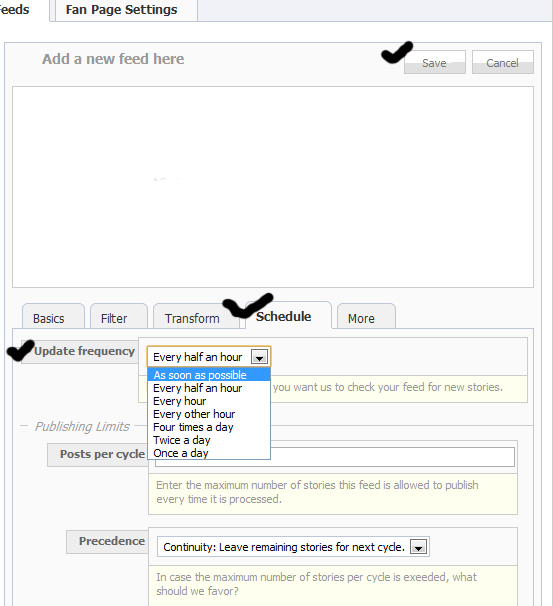
13. Click on the “Schedule button” and determine your update frequency (How many times RSS should visit your site)
14. Click on the save button.
All Done! Now your fanpage is connected with your website and Your fanpage will be updated automatically via RSS Graffitti.
Happy Blogging!!!
Add Ajax Recommended Post Slide out Widget in Blogger
“Keep your visitors stick up with your blog” This is what every blogger wants to do. Today I am going to tell you about a widget of which might do the trick for you.
"The Recommended Post slide Out Widget" does just that. It’s like inviting your reader to read a new post once he has read one of your blog entries. You may see a demo in this site. Such go below this post.
Demo of the Slide Out
Scroll down to the bottom of the post and you should see the Recommended Slide Out.

Add the Recommended Post Slide out Widget
To add the widget to your blog, you can use this one click installer.
Customizing the Recommended Slide out
1. End Of Post marker – The slide comes out when the user scrolls down to a particular point in your Blog.(the bottom of the page by default) To mark this point, you can add an HTML element there. The element should have the id bpslidein_place_holder
e.g.: <div id='bpslidein_place_holder'></div> would do the job. The best place to add this marker would be at the end of the post. If you want to do it easily, you can add this to your Blogger Template.
In your template Find,(You will have to expand the Widget Templates)
<div class='post-footer-line post-footer-line-1'>
or
<p class='post-footer-line post-footer-line-1'>
or
<data:post.body/>
Immediately below any of these, add the following snippet and save our template
<b:if cond='data:blog.pageType == "item"'>
<div style='display:none' id='bpslidein_place_holder'></div>
</b:if>
All done! Now when the reader scrolls down to this div, the slide will open up.
Happy Blogging!!!
Add a Related Post widget after every post in Blogger
It is very important to keep your visitors stick with your blog as long as possible. The related post option is such a way to keep your visitors busy.
The related posts widget will show a new related posts section below your post.The related posts widget fetches the related posts from those posts having the same label as the current post.
To apply the related posts widget you will have to follow these simple steps.
- Go to Layout >Edit HTML in your Blogger Dashboard.
- Back up your existing Template before making any changes!
- Make sure to check the "Expand Widget Templates" box.
- Search for the </head> tag.
- Add the following code just before the </head> tag.
- Now search for <data:post.body/>. In some of the templates this code may look like this
<div class='post-body>
or
<data:post.body/> - Add the following code just beneath the code you just searched for.
<b:if cond='data:blog.pageType == "item"'>
<div id="related-posts">
<font face='Arial' size='3'><b>Related Posts : </b></font><font color='#FFFFFF'><b:loop values='data:post.labels' var='label'><data:label.name/><b:if cond='data:label.isLast != "true"'>,</b:if><b:if cond='data:blog.pageType == "item"'>
<script expr:src='"/feeds/posts/default/-/" + data:label.name + "?alt=json-in-script&callback=related_results_labels&max-results=5"' type='text/javascript'/></b:if></b:loop> </font>
<script type='text/javascript'> removeRelatedDuplicates(); printRelatedLabels();
</script>
</div></b:if> - Now Save your Template.
<style> #related-posts { float : left; width : 540px; margin-top:20px; margin-left : 5px; margin-bottom:20px; font : 11px Verdana; margin-bottom:10px; } #related-posts .widget { list-style-type : none; margin : 5px 0 5px 0; padding : 0; } #related-posts .widget h2, #related-posts h2 { font-size : 20px; font-weight : normal; margin : 5px 7px 0; padding : 0 0 5px; } #related-posts a { text-decoration : none; } #related-posts a:hover { text-decoration : none; } #related-posts ul { border : medium none; margin : 10px; padding : 0; } #related-posts ul li { display : block; background : url("https://blogger.googleusercontent.com/img/b/R29vZ2xl/AVvXsEg74TpRsAXqPp2n1W0T36koNR40WBGjV-sW7_3OmJodlrCYUEKu0eklM_6YsBpEgccxK5wkyGnDAxgQJMUhVR822TvySD1Fy8tCoc37k__KiFRsKmbxxgpbqoCLyUhyphenhyphenKaHHUBLQlCm3m10/") no-repeat 0 0; margin : 0; padding-top : 0; padding-right : 0; padding-bottom : 1px; padding-left : 21px; margin-bottom : 5px; line-height : 2em; border-bottom:1px dotted #cccccc; } </style> <script src='http://theblogtemplates.com/scripts/Related_posts_hack.js' type='text/javascript'/>
All done! I think now you should have a related posts widget on your blog.
***The codes are well commented .So this can be easily removed whenever you want..
Note: If you want to display the Related Posts on every page, then remove the 4 lines of code starting with <!--Remove-->